The Xbox Series X is a powerhouse of a gaming console, delivering stunning visuals, fast load times, and immersive gameplay. However, like any electronic device, it requires regular maintenance to ensure optimal performance and longevity. Dust, dirt, and debris can accumulate over time, potentially causing overheating, noise, or hardware issues. If you’re wondering how to clean Xbox Series X, this in-depth guide provides step-by-step instructions, expert tips, and safety precautions to keep your console in pristine condition.
This article covers everything from external cleaning to internal dust removal, troubleshooting common issues, and answers to high-volume questions. Whether you’re a casual gamer or a dedicated enthusiast, you’ll find clear, actionable advice to maintain your Xbox Series X in 2025, backed by Microsoft’s recommendations and industry best practices.
Why Cleaning Your Xbox Series X Is Important
Regular cleaning of your Xbox Series X prevents performance issues and extends the console’s lifespan. Here’s why maintenance matters:
- Prevent Overheating: Dust buildup in vents or on internal components can block airflow, causing the console to overheat, which may lead to performance throttling or hardware damage.
- Reduce Fan Noise: Accumulated dust can make the cooling fan work harder, resulting in louder operation.
- Maintain Performance: A clean console ensures efficient cooling, allowing the Xbox Series X to run games at peak performance without lag or crashes.
- Extend Lifespan: Proper care protects internal components like the motherboard and GPU, reducing the risk of costly repairs.
- Preserve Aesthetics: Keeping the exterior clean maintains the console’s sleek, modern look.
Microsoft recommends regular maintenance to keep your Xbox Series X running smoothly, especially if you notice increased fan noise or heat output. Let’s dive into the tools and methods needed to clean your console safely.
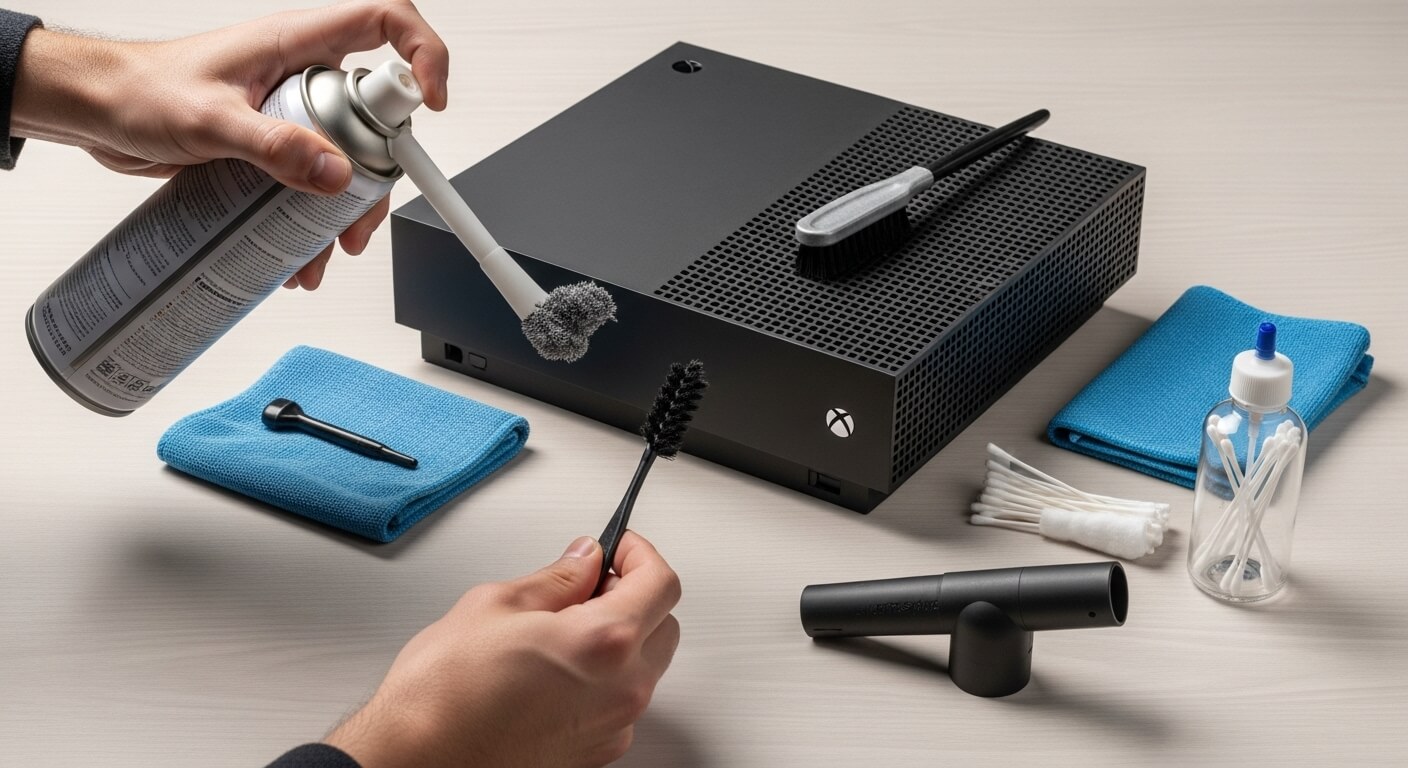
Tools and Supplies Needed for Cleaning
Before cleaning your Xbox Series X, gather the following tools to ensure a safe and effective process:
- Microfiber Cloth: Soft, lint-free cloth for wiping the exterior without scratching.
- Compressed Air Can: For blowing dust out of vents and hard-to-reach areas.
- Small Soft-Bristle Brush: A clean paintbrush or toothbrush for dislodging dust from vents.
- Isopropyl Alcohol (70% or Higher): For disinfecting and removing smudges.
- Cotton Swabs: For precise cleaning of ports and crevices.
- Screwdriver (T8 or T9 Torx): Only if you plan to open the console for internal cleaning (advanced users only).
- Anti-Static Wrist Strap: To prevent static damage during internal cleaning.
- Vacuum Cleaner with Small Nozzle (Optional): For sucking up loose dust (use cautiously).
Safety Precautions:
- Always power off and unplug the Xbox Series X before cleaning.
- Avoid using water or liquid cleaners directly on the console.
- Never use a vacuum cleaner near internal components, as it can generate static electricity.
- If opening the console, ensure you’re comfortable with electronics and understand warranty implications.
Step-by-Step Guide to Cleaning Your Xbox Series X
Cleaning your Xbox Series X involves two main approaches: external cleaning (safe for all users) and internal cleaning (for advanced users). Below, we outline detailed steps for each method.
Method 1: External Cleaning (Safe for All Users)
External cleaning focuses on the console’s outer surface, vents, and ports, requiring no disassembly. This method is sufficient for most users and should be done every 1–3 months, depending on your environment.
Step 1: Power Off and Unplug the Console
- Save your game progress and turn off the Xbox Series X by pressing the Xbox button on the console or controller, then selecting Power Off.
- Unplug the power cable, HDMI cable, and any other peripherals from the console.
- Allow the console to cool for 10–15 minutes to avoid handling warm components.
Step 2: Wipe Down the Exterior
- Use a dry microfiber cloth to gently wipe the console’s surface, removing dust, fingerprints, and smudges.
- For stubborn smudges, lightly dampen the microfiber cloth with a 1:1 mix of water and isopropyl alcohol (70% or higher). Wring out excess liquid to ensure the cloth is barely damp.
- Wipe the top, sides, and front of the console, avoiding ports and vents.
- Dry the surface immediately with a dry microfiber cloth to prevent streaks.
Pro Tip: Avoid abrasive materials like paper towels, which can scratch the console’s matte finish.
Step 3: Clean the Vents
The Xbox Series X’s large top vent and side ports are prone to dust buildup, which can obstruct airflow. Here’s how to clean them:
- Use a can of compressed air to blow short bursts into the top vent, holding the can upright to avoid spraying liquid propellant.
- Angle the compressed air at 45 degrees to dislodge dust without pushing it deeper into the console.
- Use a soft-bristle brush (e.g., a clean toothbrush) to gently loosen dust from the vent’s edges.
- If dust falls onto the surface, wipe it away with a microfiber cloth or use a vacuum cleaner with a small nozzle (held 2–3 inches away) to suck up loose particles.
Warning: Do not insert objects into the vents, as this can damage internal components like the fan.
Step 4: Clean the Ports
Dust and debris in USB, HDMI, or Ethernet ports can cause connectivity issues. Follow these steps:
- Use compressed air to blow dust out of each port, keeping the can 1–2 inches away.
- Dip a cotton swab in isopropyl alcohol and gently clean the edges of the ports to remove grime.
- Allow the ports to air-dry for 2–3 minutes before reconnecting cables.
Step 5: Clean the Disc Drive (If Applicable)
If you insert discs frequently, the disc drive slot may collect dust:
- Use compressed air to blow dust out of the disc drive slot.
- Wipe the area around the slot with a microfiber cloth lightly dampened with isopropyl alcohol.
- Insert and eject a clean, unused disc to ensure the slot is clear of debris.
Step 6: Reassemble and Test
- Reconnect all cables and peripherals.
- Place the console in a well-ventilated area, ensuring at least 4–6 inches of clearance around the top and sides.
- Power on the console and check for normal operation (e.g., no excessive fan noise).
This external cleaning routine keeps your Xbox Series X dust-free and maintains efficient cooling without voiding the warranty.
Method 2: Internal Cleaning (Advanced Users Only)
Internal cleaning involves opening the Xbox Series X to remove dust from the fan and heatsink. This method is recommended only for experienced users, as it may void your warranty and carries risks of damaging components. Perform internal cleaning every 6–12 months or if you notice persistent overheating or loud fan noise.
Warning: Opening your Xbox Series X may void the warranty. Check Microsoft’s warranty terms at support.xbox.com or contact Xbox Support before proceeding. If unsure, consult a professional technician.
Step 1: Prepare Your Workspace
- Work in a clean, well-lit area with a flat surface.
- Wear an anti-static wrist strap to prevent static damage to internal components.
- Gather a T8 or T9 Torx screwdriver, compressed air, a soft-bristle brush, and isopropyl alcohol.
Step 2: Power Off and Disassemble
- Power off and unplug the Xbox Series X, allowing it to cool for 15–20 minutes.
- Remove the plastic base by gently pulling it off (it’s held by clips, not screws).
- Locate the security screws on the back of the console (under the tamper-evident sticker, if present).
- Use a T8 or T9 Torx screwdriver to remove the screws securing the outer casing.
- Carefully slide off the top plastic cover, exposing the internal components. Avoid forcing it to prevent damage.
Note: Breaking the tamper-evident sticker may void your warranty. Proceed at your own risk.
Step 3: Clean the Fan
- Locate the cooling fan near the top of the console.
- Use compressed air to blow dust off the fan blades, holding the fan in place to prevent it from spinning too fast (which can damage bearings).
- Use a soft-bristle brush to gently dislodge stubborn dust from the fan blades and surrounding areas.
- Wipe the fan housing with a microfiber cloth lightly dampened with isopropyl alcohol, if needed.
Step 4: Clean the Heatsink and Vents
- Identify the heatsink (a metal component with fins near the fan).
- Use compressed air to blow dust out of the heatsink fins, directing airflow outward to avoid pushing dust deeper.
- Brush away any remaining dust with a soft-bristle brush.
- Clean the internal vents using compressed air and a brush, focusing on areas near the fan and power supply.
Step 5: Reassemble the Console
- Reattach the top cover, ensuring it snaps into place securely.
- Replace and tighten the security screws.
- Reattach the plastic base.
- Reconnect all cables and place the console in a well-ventilated area.
Step 6: Test the Console
- Power on the Xbox Series X and listen for fan noise. It should be quieter than before cleaning.
- Run a demanding game (e.g., Halo Infinite) for 20–30 minutes to check for overheating or performance issues.
- If problems persist, contact Xbox Support or a professional technician.
Pro Tip: If you’re uncomfortable opening the console, many electronics repair shops offer professional cleaning services for gaming consoles.
Troubleshooting Common Cleaning Issues
Cleaning your Xbox Series X should be straightforward, but issues may arise. Below are solutions to common problems.
Console Overheats After Cleaning
If your Xbox Series X runs hot after cleaning:
- Check Ventilation: Ensure the console has 4–6 inches of clearance around all sides, especially the top vent.
- Verify Fan Functionality: Listen for fan noise during gameplay. If the fan is silent or excessively loud, it may need repair.
- Inspect Heatsink (Advanced Users): If you cleaned internally, ensure no dust remains in the heatsink fins.
- Update Firmware: Go to Settings > System > Updates to ensure the console is running the latest software, as updates can optimize cooling.
Fan Noise Persists
If the fan remains loud after cleaning:
- Reclean Vents and Fan: Repeat the external or internal cleaning process, focusing on the fan and vents.
- Check Environment: Dusty or pet-heavy environments can cause rapid dust buildup. Clean the console more frequently (e.g., every 1–2 months).
- Contact Support: Persistent noise may indicate a faulty fan. Contact Xbox Support for assistance.
Console Won’t Power On After Internal Cleaning
If the Xbox Series X doesn’t turn on after reassembly:
- Check Connections: Ensure all internal cables (e.g., power supply, fan) are securely reconnected.
- Inspect for Damage: Verify no components were damaged during cleaning (e.g., bent heatsink fins).
- Reset Power: Unplug the console for 10 minutes, then plug it back in and try again.
- Seek Professional Help: If the issue persists, contact a certified technician or Xbox Support.
Tips for Preventing Dust Buildup
Preventing dust accumulation reduces the need for frequent cleaning and keeps your Xbox Series X running smoothly. Follow these tips:
- Place in a Well-Ventilated Area: Position the console vertically in an open space with at least 4–6 inches of clearance around the top and sides.
- Avoid Dusty Environments: Keep the console away from carpets, pet areas, or open windows where dust can settle.
- Use a Dust Cover: When not in use, cover the console with a breathable dust cover (avoid plastic, which traps heat).
- Clean Regularly: Perform external cleaning every 1–3 months and internal cleaning (if comfortable) every 6–12 months.
- Monitor Room Conditions: Use an air purifier or keep your gaming area clean to reduce airborne dust.
FAQs: High-Volume Questions About Cleaning Xbox Series X
Below are answers to frequently asked questions to help gamers maintain their Xbox Series X effectively.
1. How Often Should I Clean My Xbox Series X?
Clean the exterior and vents every 1–3 months, depending on your environment (e.g., more frequently in dusty or pet-heavy homes). Internal cleaning is recommended every 6–12 months for advanced users, or when you notice overheating or loud fan noise.
2. Can I Use a Vacuum Cleaner to Clean My Xbox Series X?
Use a vacuum cleaner cautiously with a small nozzle to suck up loose dust from the exterior or vents, keeping it 2–3 inches away. Never use a vacuum near internal components, as it can generate static electricity and damage electronics.
3. Will Cleaning My Xbox Series X Void the Warranty?
External cleaning (wiping, compressed air) does not void the warranty. Internal cleaning, which involves opening the console, may void the warranty if the tamper-evident sticker is broken. Check Microsoft’s warranty terms at support.xbox.com before proceeding.
4. What Should I Do If My Xbox Series X Overheats?
If your console overheats:
- Ensure proper ventilation with 4–6 inches of clearance.
- Clean the vents and fan using compressed air and a soft brush.
- Check for firmware updates in Settings > System > Updates.
- If issues persist, contact Xbox Support or a professional technician.
5. Can I Use Water to Clean My Xbox Series X?
Never use water directly on the console, as it can damage electronics. Instead, use a microfiber cloth lightly dampened with a 1:1 mix of water and isopropyl alcohol (70% or higher) for the exterior, and dry immediately.
6. How Do I Clean the Xbox Series X Disc Drive?
Use compressed air to blow dust out of the disc drive slot. Wipe the surrounding area with a microfiber cloth lightly dampened with isopropyl alcohol. Insert and eject a clean disc to ensure the slot is clear.
7. Why Is My Xbox Series X Fan So Loud?
Loud fan noise is often caused by dust buildup. Clean the vents and fan (externally or internally) using compressed air and a soft brush. If the noise persists, the fan may be faulty, requiring professional repair.
8. Can I Clean My Xbox Series X Without Opening It?
Yes, external cleaning with a microfiber cloth, compressed air, and a soft brush is sufficient for most users. This method cleans vents, ports, and the exterior without voiding the warranty.
9. Is It Safe to Use Compressed Air on My Xbox Series X?
Yes, compressed air is safe when used correctly. Hold the can upright, use short bursts, and keep it 1–2 inches from vents or ports. Avoid tilting the can to prevent spraying liquid propellant.
10. Can I Take My Xbox Series X to a Professional for Cleaning?
Yes, electronics repair shops or certified technicians can clean your Xbox Series X safely, especially for internal cleaning. Contact Xbox Support or a local repair service for recommendations.
11. How Do I Know If My Xbox Series X Needs Cleaning?
Signs your console needs cleaning include:
- Increased fan noise during gameplay.
- The console feels hot to the touch.
- Performance issues like lag or crashes.
- Visible dust in vents or on the exterior.
12. Can Dust Damage My Xbox Series X?
Yes, dust can block airflow, causing overheating, performance throttling, or hardware damage over time. Regular cleaning prevents these issues and extends the console’s lifespan.
Conclusion
Keeping your Xbox Series X clean is essential for maintaining peak performance, preventing overheating, and extending the console’s lifespan. By following the external cleaning steps outlined above, most gamers can keep their console in top condition without risking warranty issues. For advanced users, internal cleaning offers a deeper maintenance option, but it requires caution and technical know-how.
With the right tools, regular maintenance, and preventive measures, your Xbox Series X will continue to deliver immersive gaming experiences in 2025 and beyond. Bookmark this guide for quick reference, and consult support.xbox.com for additional resources or professional assistance. Keep your console clean, and enjoy uninterrupted gaming!

The editor of All-AI.Tools is a professional technology writer specializing in artificial intelligence and chatbot tools. With a strong focus on delivering clear, accurate, and up-to-date content, they provide readers with in-depth guides, expert insights, and practical information on the latest AI innovations. Committed to fostering understanding of fun AI tools and their real-world applications, the editor ensures that All-AI.Tools remains a reliable and authoritative resource for professionals, developers, and AI enthusiasts.